Connect Asterisk to WhatsApp with a QR Code
Your phone system already handles calls for the office. Your customers call you on WhatsApp. This tutorial joins the two: you scan a QR code once, and from then on WhatsApp calls ring your Asterisk phones, and your Asterisk users can dial WhatsApp numbers as if they were ordinary phone numbers.
There's no Meta approval and no new phone number: WhatsMCP links your existing WhatsApp number as a device — exactly like WhatsApp Web — and runs a small SIP "bridge" for it that registers into your Asterisk like a desk phone.
Follow the steps in order. Each one ends with a quick check, so you always know where you stand. Plan on about 20–30 minutes.
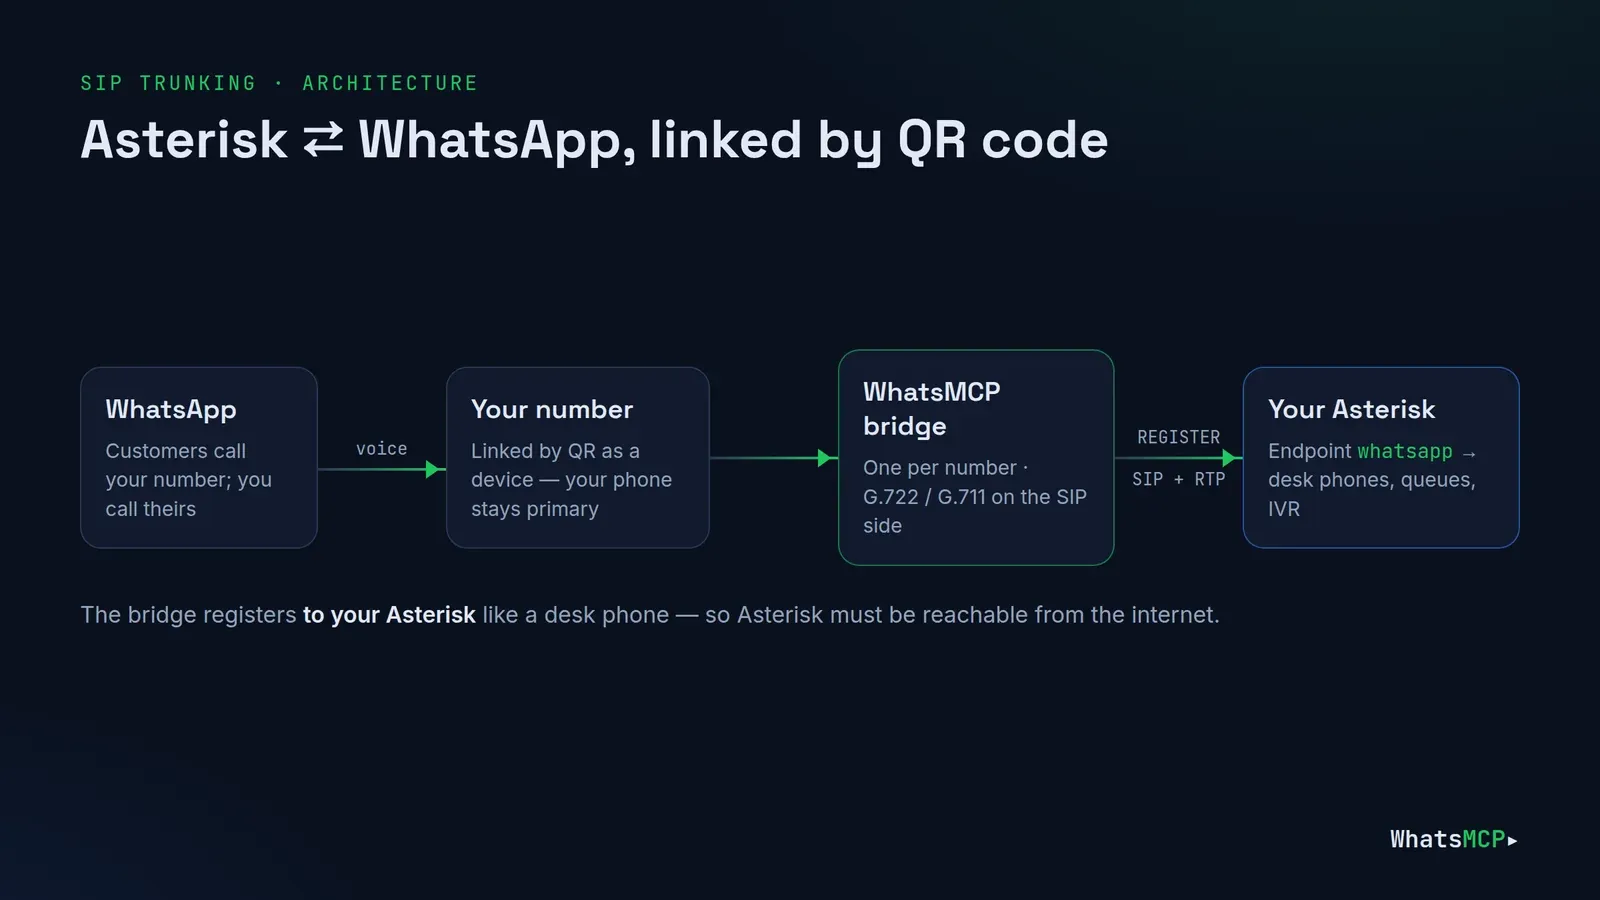
How it works (one minute of theory)
- Your WhatsApp number is linked to WhatsMCP as a linked device by scanning a QR code. Your phone stays the main device.
- WhatsMCP runs a bridge for that number. The bridge registers to your Asterisk with a username and password you create — to Asterisk it's just another SIP endpoint.
- Incoming WhatsApp call → the bridge sends a SIP call to your Asterisk, to the extension you choose.
- Outgoing call → Asterisk dials the bridge with the WhatsApp number as the destination, and the bridge places the WhatsApp call.
So you don't configure a "trunk registration" to a provider. You create an endpoint for the bridge — and your Asterisk must be reachable from the internet so the bridge can register to it.
What you need
- Asterisk 20, 22 or 23 with
chan_pjsip(the default), and root access to edit its config. FreePBX works too — see the FreePBX notes near the end. - A public address for Asterisk — a static IP or a DNS name — with UDP 5060 (or TLS 5061) and your RTP port range open to the internet.
- A WhatsApp number on a phone you can scan a QR code with. A Personal (or WhatsApp Business app) number — official WhatsApp Business API numbers can't take calls.
- A WhatsMCP plan with calls. Of the Personal plans, Pro includes incoming and outgoing calls and SIP. See Plans.
- A SIP phone or softphone registered to your Asterisk for testing (we'll use extension
1001).
Step 1 — Create your WhatsMCP workspace
- Go to console.whatsmcp.com/register.
- Enter your name and email, accept the terms, and press Send confirmation link.
- Open the email, choose how you'll use WhatsApp (pick Voice calls / SIP / PBX), set a password and press Create my workspace.
✅ Check: you're signed in and the setup guide opens Add a number.
Step 2 — Link your WhatsApp number with a QR code
- On Add a number, choose Personal WhatsApp → Link a device via QR.
- On your phone, open WhatsApp → Settings → Linked devices → Link a device.
- Scan the QR code in the console. It refreshes every ~20 seconds — just scan the current one.
- Wait while the progress goes Code → Scanned → Syncing → Ready.
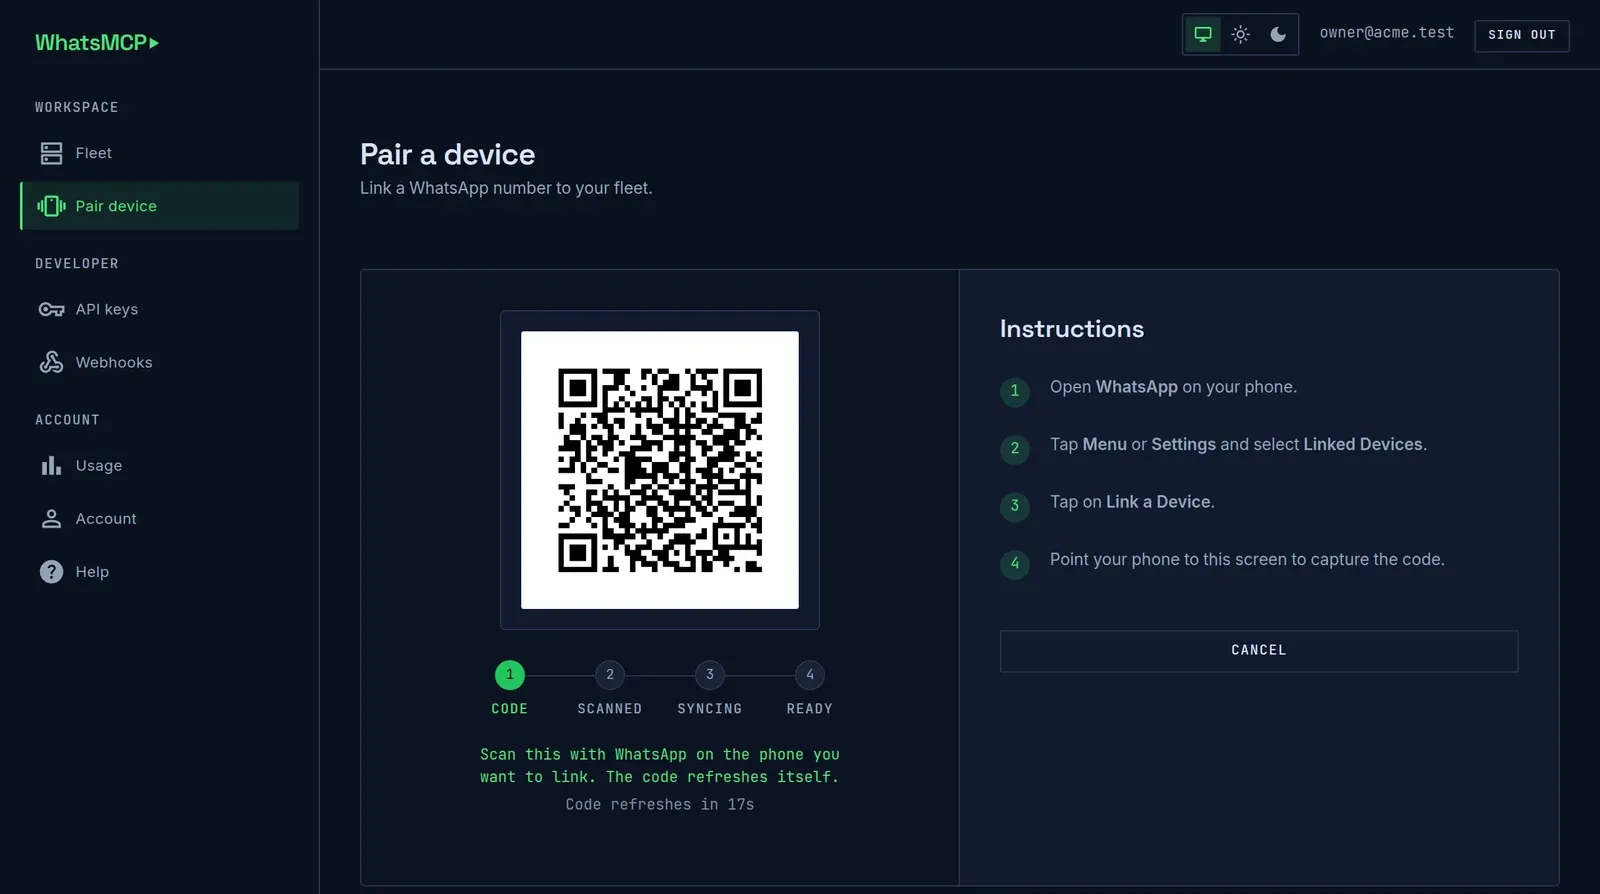
✅ Check: the console says "Ready. +44 … is linked and synced." — or "Linked. … needs a plan before it runs." if this isn't your first number. Either is fine; Step 3 sorts out the plan.
Keep the phone charged and online most of the time. WhatsApp unlinks devices whose phone has been offline for a long period.
Step 3 — Put the number on a plan with calls
- Open Plans for this number (from the console's plan page, or the Choose a plan for this number button after pairing).
- Choose Pro — the Personal plan that includes incoming and outgoing calls and SIP — and complete checkout.
✅ Check: open the number's SIP trunk page in the console. It should show "Voice plan: Pro. Incoming and outgoing calls…" instead of "This number needs a plan with calls."
Leave this page open — you'll come back to it in Step 8.
Step 4 — Make Asterisk reachable
The bridge connects to Asterisk from the internet, so Asterisk must know its public address and accept SIP and RTP from outside.
4a. Transport — in /etc/asterisk/pjsip.conf (adjust the networks and address to yours):
[transport-udp]
type=transport
protocol=udp
bind=0.0.0.0:5060
; Only if Asterisk is behind NAT (a router or cloud VPC):
local_net=192.168.1.0/24
external_media_address=203.0.113.10
external_signaling_address=203.0.113.10
4b. RTP ports — in /etc/asterisk/rtp.conf:
[general]
rtpstart=10000
rtpend=20000
4c. Firewall and router
- Allow UDP 5060 and UDP 10000–20000 to the Asterisk server (port-forward them if it's behind a router).
- Turn off SIP ALG on the router — it rewrites SIP packets and breaks audio.
- Use a long random password in Step 5: this endpoint is reachable from the internet.
✅ Check: from outside your network (a phone on mobile data with a SIP app, or an online port checker), UDP 5060 on your public address is reachable.
Prefer encrypted signalling? WhatsMCP also supports TLS (port 5061). Your Asterisk then needs a TLS transport with a certificate from a public CA for the name you'll enter in Step 8. Call audio is plain RTP either way.
Step 5 — Create the WhatsApp endpoint in Asterisk
Add this to /etc/asterisk/pjsip.conf. The bridge will log in with the username whatsapp — keep the endpoint name and the username the same, because Asterisk uses the caller's username to recognise the bridge's calls.
; ---- WhatsApp bridge (registers to us like a phone) ----
[whatsapp]
type=auth
auth_type=userpass
username=whatsapp
password=CHANGE-ME-to-a-long-random-password

[whatsapp]
type=aor
max_contacts=1
remove_existing=yes
qualify_frequency=60

[whatsapp]
type=endpoint
transport=transport-udp
context=from-whatsapp
disallow=all
allow=g722,ulaw,alaw
auth=whatsapp
aors=whatsapp
direct_media=no
rtp_symmetric=yes
force_rport=yes
rewrite_contact=yes
Why these settings:
allow=g722,ulaw,alaw— the bridge offers exactly these: G.722 (wideband) first, then G.711 μ-law and A-law. Don't listopus; it isn't offered on the SIP side, and WhatsMCP converts WhatsApp's own audio for you.direct_media=no,rtp_symmetric,force_rport,rewrite_contact— keep audio flowing through Asterisk and send it back to wherever the bridge's packets actually come from. This is what prevents one-way audio across NAT.max_contacts=1,remove_existing=yes— one bridge per number; a re-registration replaces the old one.
✅ Check: nothing yet — we'll reload after the dialplan.
Step 6 — Route incoming WhatsApp calls
Incoming WhatsApp calls arrive in the from-whatsapp context, at the extension to ring you'll set in Step 8. Pick one of the two styles.
Option A — ring a fixed extension (simplest). Leave the console's Extension to ring blank (it defaults to 101) and route 101 to your phones:
; /etc/asterisk/extensions.conf
[from-whatsapp]
exten => 101,1,NoOp(Incoming WhatsApp call)
 same => n,Set(CALLERID(name)=WhatsApp)
 same => n,Dial(PJSIP/1001,30)          ; or Queue(support), or Dial(PJSIP/1001&PJSIP/1002)
 same => n,Hangup()
Option B — see who's calling. Set Extension to ring to caller. The bridge then dials the caller's WhatsApp number as the extension, so you can show it and route on it:
[from-whatsapp]
exten => _X.,1,NoOp(WhatsApp call from +${EXTEN})
 same => n,Set(CALLERID(num)=+${EXTEN})
 same => n,Set(CALLERID(name)=WhatsApp)
 same => n,Dial(PJSIP/1001,30)
 same => n,Hangup()
Use Option B if you want the caller's number on your desk phones or in call logs — with a fixed extension, Asterisk only sees the bridge, not the caller. (There's also 9:caller, which puts a prefix in front — e.g. 9447700900123 — if you'd rather match a prefixed pattern.)
Step 7 — Let your phones dial WhatsApp
Add a pattern to the context your phones use (often from-internal). Here users dial 9 followed by the full international number, and Asterisk sends it to the bridge:
[from-internal]
; 9 + international number, e.g. 9447700900123 → WhatsApp +44 7700 900123
exten => _9X.,1,NoOp(Calling WhatsApp +${EXTEN:1})
 same => n,Dial(PJSIP/${EXTEN:1}@whatsapp,60)
 same => n,Hangup()
The number you send must be 8–15 digits in international format, without a leading 0 — 447700900123, not 07700 900123. A leading + is tolerated. The WhatsApp call always goes out from the number you linked in Step 2.
Now load everything:
asterisk -rx "core reload"
asterisk -rx "pjsip show endpoint whatsapp"
✅ Check: pjsip show endpoint whatsapp lists the endpoint with its auth and aor. It shows Unavailable for now — the bridge hasn't registered yet.
Step 8 — Point WhatsMCP at your Asterisk
Back on the number's SIP trunk page in the console, fill in Account settings:
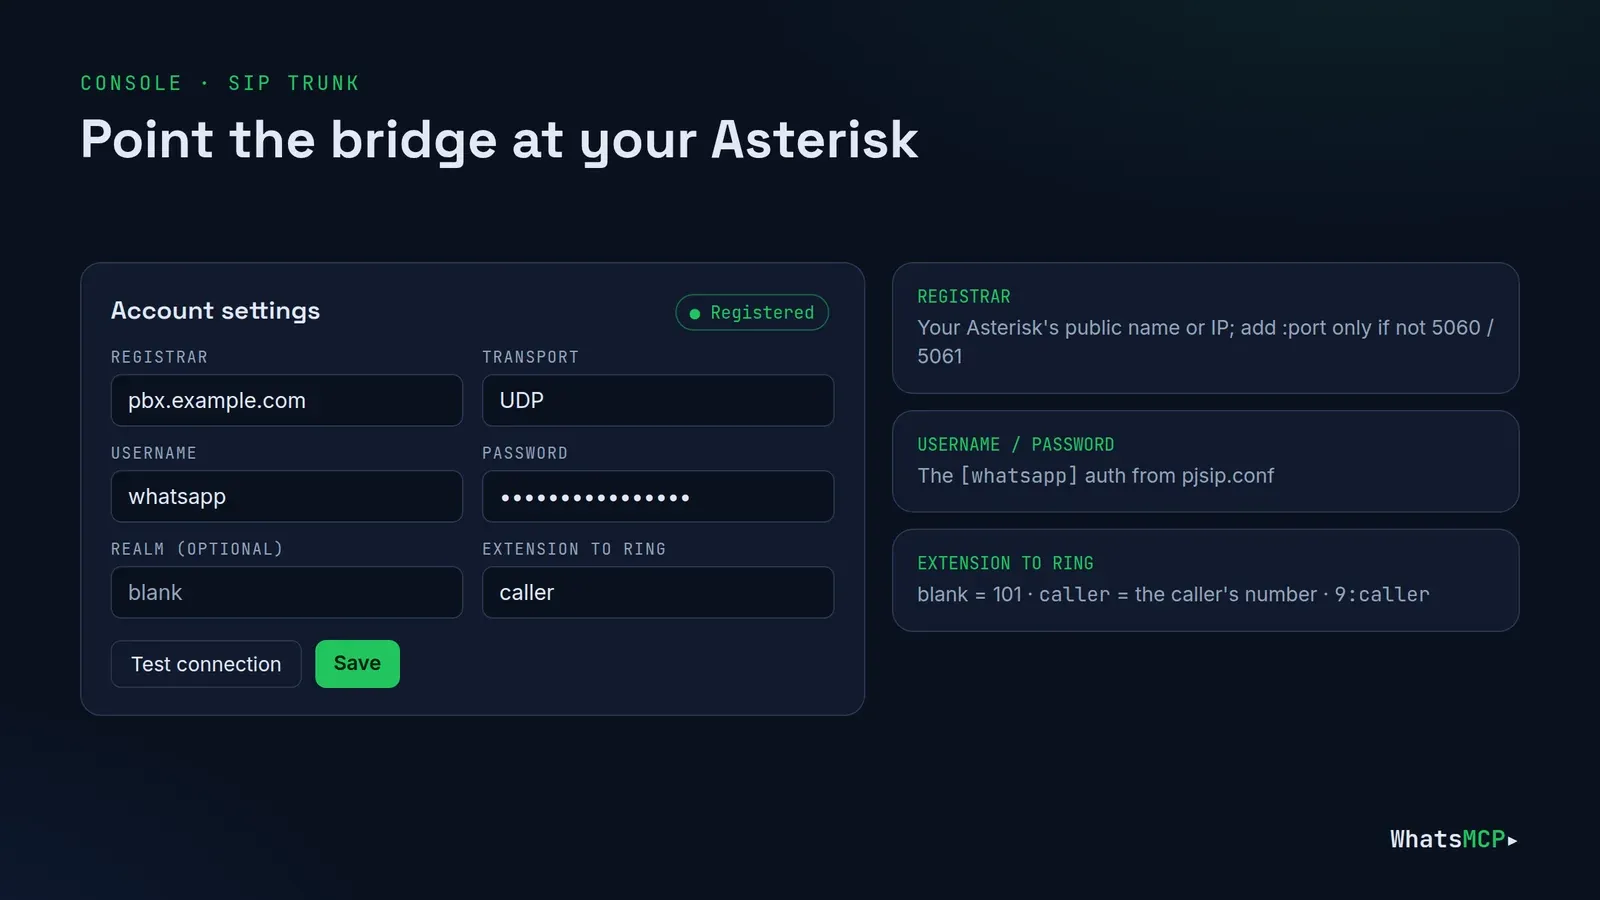
| Field | What to enter |
|---|---|
| Registrar | Your Asterisk's public address, e.g. pbx.example.com or 203.0.113.10. Add :port only if it isn't 5060 (UDP) or 5061 (TLS). |
| Transport | UDP, or TLS (encrypted signalling) if you set up Step 4's TLS option |
| Username | whatsapp |
| Password | The password from Step 5 (stored encrypted, never shown again) |
| Realm (optional) | Leave blank — the bridge uses whatever realm Asterisk sends (asterisk by default) |
| Extension to ring | Blank (= 101, Option A) or caller (Option B) |
- Press Test connection. WhatsMCP sends a real registration to your Asterisk.
- When it says "The registrar answered", press Save, then Apply and restart if prompted.
✅ Check: the page shows Registered. On the Asterisk side:
asterisk -rx "pjsip show contacts"
You should see one contact under the whatsapp AOR with status Avail.
Step 9 — Make your first calls
Incoming: from another phone, call your WhatsApp number using WhatsApp. Extension 1001 rings; answer and talk.
Outgoing: from extension 1001, dial 9 and a WhatsApp number in international format — for example 9447700900123. The person's WhatsApp rings, showing your linked number.
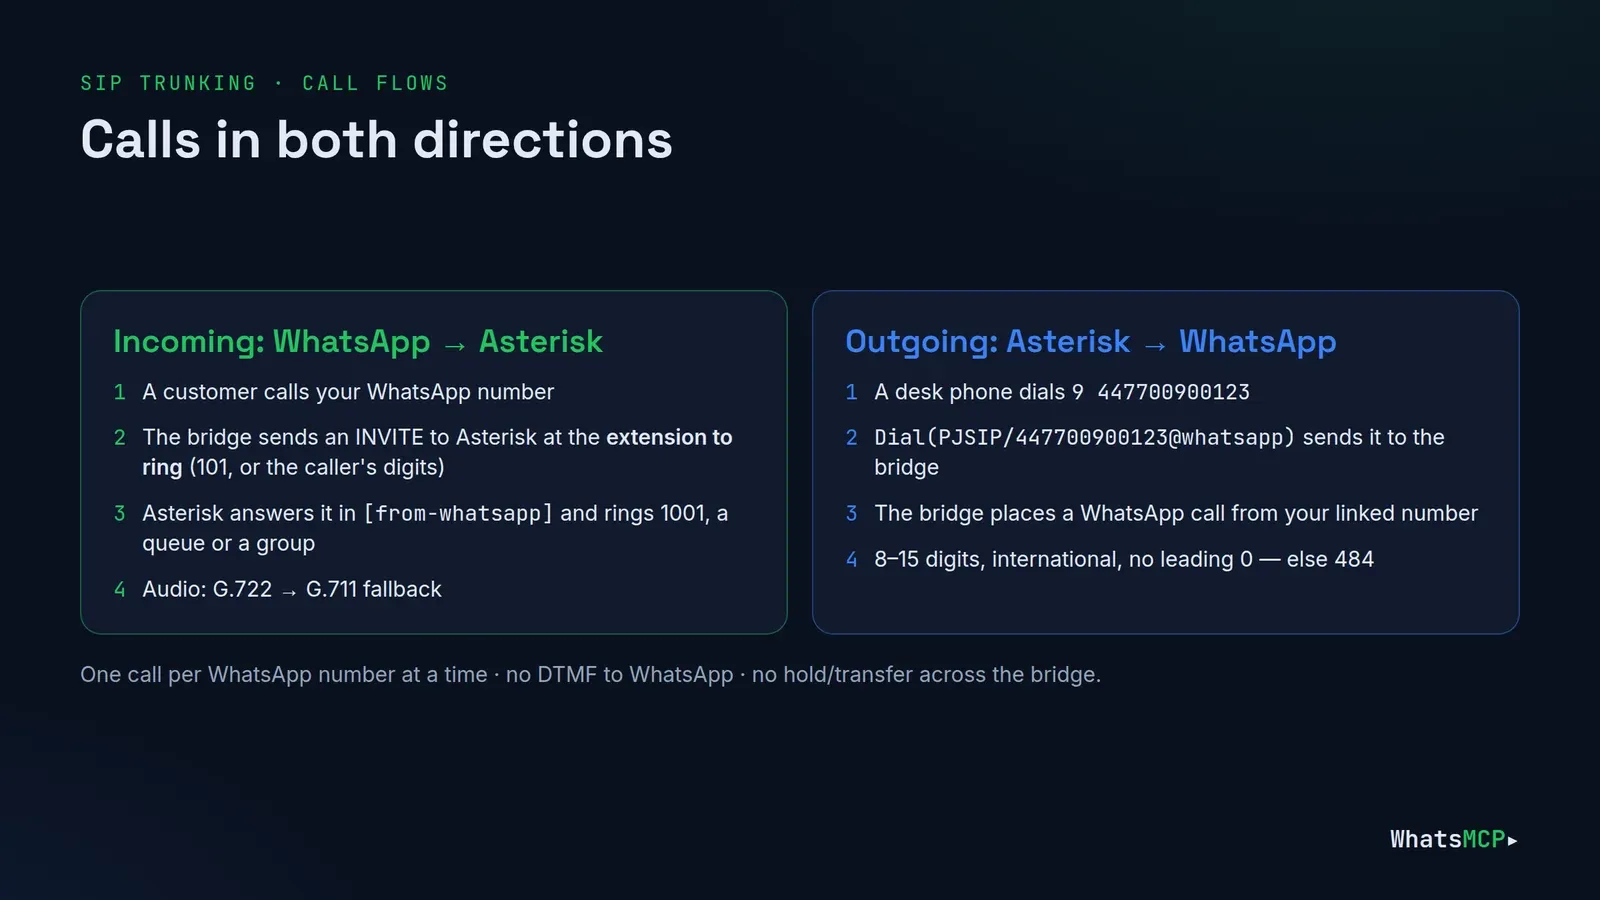
✅ Check: while a call is up, asterisk -rx "core show channels" shows a PJSIP/whatsapp-… channel, and you hear audio both ways.
Troubleshooting
| What you see | Likely cause | Fix |
|---|---|---|
| Test connection fails, nothing in Asterisk's log | The bridge can't reach Asterisk | Check the registrar address, port forwarding and firewall for UDP 5060 |
| Test fails with an authentication error | Username or password differ | The username must be whatsapp and the endpoint name must match; retype the password |
| Registered, but incoming calls don't ring | Dialplan doesn't match the extension | Check Extension to ring matches a pattern in [from-whatsapp] (101, or _X. for caller) |
| Calls connect but there's no audio, or audio one way | NAT or blocked RTP | Set local_net / external_* (Step 4a), open the RTP range, disable SIP ALG; keep rtp_symmetric, force_rport, rewrite_contact |
| Outgoing call fails immediately with 484 | Number format | Send 8–15 digits in international format, no leading 0 |
| Outgoing call gets 486 Busy Here | The number is already on a call | One call per WhatsApp number at a time |
| 488 Not Acceptable Here | No common codec | Make sure the endpoint allows g722, ulaw or alaw |
| Outgoing calls refused with 403 | The plan allows incoming calls only | Choose a plan with outgoing calls |
Useful Asterisk commands while testing:
asterisk -rvvv
pjsip set logger on        # watch the SIP messages
rtp set debug on           # confirm audio flows both ways
pjsip show contacts
core show channels
Limits worth knowing
- One call at a time per WhatsApp number. A second call gets 486 Busy Here. Need more lines? Link more numbers.
- No keypad tones (DTMF) to or from WhatsApp. An IVR that says "press 1" won't hear WhatsApp callers' key presses — use time-based routing, a queue, or speech instead.
- No hold or transfer requests across the bridge. The bridge doesn't accept re-INVITEs or REFER, so plan call handling on the Asterisk side — test any transfer flow you rely on.
- Voice only — no video on the SIP side.
- Audio is plain RTP, even with TLS signalling.
- Personal numbers only. Official WhatsApp Business API numbers can't take calls through WhatsMCP.
- Your phone stays the primary device. If WhatsApp unlinks the device, re-scan the QR code (Step 2); the SIP settings stay.
Using FreePBX instead
The same idea in FreePBX's screens:
- Applications → Extensions → Add Extension → Add New PJSIP Extension, e.g. extension
2000, with a strong Secret. This is the bridge's account. - In Settings → Asterisk SIP Settings, set External Address and Local Networks, and check the RTP port range.
- In the WhatsMCP console (Step 8), use Username
2000, the extension's secret as Password, and your FreePBX's public address as Registrar. Set Extension to ring to the extension or ring group that should answer. - For outgoing calls, add Connectivity → Trunks → Add Custom Trunk with the dial string
PJSIP/$OUTNUM$@2000, then an Outbound Route (for example prefix9) that uses it. - Set the extension's codecs to G.722, G.711 μ-law and A-law.
No Asterisk? Use a hosted line
If you don't run a PBX, the same SIP trunk page offers Create a hosted line: WhatsMCP hosts the registrar and gives you SIP credentials to use in any softphone or IP phone. See WhatsApp SIP trunking for the details.
FAQ
Does this need the WhatsApp Business API or Meta approval?
No. The number is linked by QR code as a device, like WhatsApp Web. That also means it isn't an official Meta integration: WhatsMCP is independent, and linked-device use falls outside WhatsApp's terms — use a number you can spare and keep calls to people who expect them.
Can I keep using WhatsApp on my phone?
Yes. Your phone stays the main device and keeps working as normal; linking a device doesn't remove WhatsApp from it.
Which codecs does the bridge use on the SIP side?
G.722 first, then G.711 μ-law and A-law. WhatsMCP converts WhatsApp's own audio for you, so Asterisk needs no Opus module.
Can my Asterisk register to WhatsMCP instead?
Not for your own PBX — the bridge registers to your Asterisk. If you'd rather register to a server we host, use a hosted line.
How many simultaneous calls can I make?
One per linked WhatsApp number. Link more numbers for more simultaneous calls; each one gets its own SIP account.
Get started
Create your WhatsMCP workspace, scan the QR code, and follow the nine steps above. For the architecture behind the bridge, read Bridging WhatsApp and your PBX.
About WhatsMCP Engineering
Engineering Team at WhatsMCP. The team building WhatsMCP's MCP server and SIP bridge — the people who wrote the code these posts describe.